If you love crafting, floral décor, or preserving garden memories, drying flowers is a wonderful skill to learn.
While air-drying can take weeks, the oven-drying method offers a much faster alternative — often done in just a few hours.
With a bit of care, you can dry flowers in your oven while keeping their shape and color beautifully intact.
Here’s everything you need to know about how to dry flowers in the oven, step by step.

1. Choose the Right Flowers
Not every flower is ideal for oven drying. Some delicate varieties can scorch or lose color under heat.
The best flowers to dry in the oven are those with sturdy petals and medium moisture content.
Great choices include:
-
Roses (especially smaller blooms)
-
Daisies
-
Sunflowers (small heads)
-
Zinnias
-
Hydrangeas
-
Baby’s breath
-
Chrysanthemums
Tip: Avoid flowers that are already wilting or damp from rain—they won’t dry evenly.
2. Gather Your Supplies
You’ll need a few simple tools and materials:
-
Fresh flowers (clean and dry)
-
Scissors or pruning shears
-
Baking sheet
-
Parchment paper or foil
-
Oven mitts
-
Optional: Silica gel (for better color preservation)
3. Preheat the Oven
Set your oven to a low temperature — between 170°F and 200°F (75°C to 95°C).
A lower temperature is better because it dries the flowers slowly without burning or browning them.
If your oven doesn’t go that low, leave the door slightly cracked open using a wooden spoon to release moisture and lower the internal heat.
4. Prepare the Flowers
-
Trim the stems to your desired length (usually 3–6 inches).
-
Remove leaves from the lower parts of the stem.
-
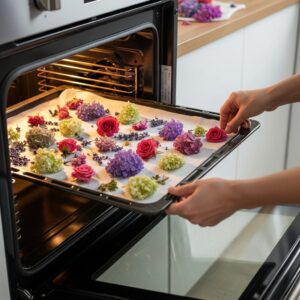
Lay them flat on a parchment-lined baking sheet, spacing each bloom apart so air can circulate freely.
If you want to preserve the 3D shape of your flowers, place them upright in an oven-safe wire rack instead of flat on a pan.
5. Dry the Flowers
Place the baking sheet in the oven and check the flowers every 30 minutes.
Most flowers take 1 to 2 hours to fully dry, depending on their thickness and moisture content.
You’ll know they’re ready when:
-
The petals feel crisp and papery
-
The stems snap cleanly instead of bending
Important: Avoid turning up the temperature—it can cause petals to curl or discolor.
6. Cool and Protect
Once the flowers are dry, remove them carefully from the oven and let them cool completely on the tray.
Handle them gently—they’re fragile and can crumble if moved while still warm.
After cooling, you can:
-
Lightly spray them with hairspray or floral sealant for extra protection
-
Use them immediately in arrangements or crafts
7. Store or Display
Now that your flowers are oven-dried, you can use them in:
-
Dried floral arrangements
-
Resin art and jewelry
-
Wreaths or potpourri
-
Shadow boxes or framed wall art
To keep them looking vibrant, store them in a dry, dark place away from humidity and direct sunlight.
Extra Tips for Best Results
-
For brighter color, add silica gel on the tray under the blooms before drying.
-
Don’t overcrowd the pan — air circulation is key to even drying.
-
Avoid microwaving as a shortcut; ovens provide gentler, more consistent heat.
-
Check frequently during drying to prevent browning or scorching.
Drying flowers in the oven is one of the quickest and easiest ways to preserve your favorite blooms.
In just a couple of hours, you can transform fresh flowers into long-lasting keepsakes for décor or craft projects.
Whether you’re preserving a bouquet, saving garden flowers, or creating handmade gifts, this heat-drying method gives you beautiful results—fast, simple, and full of color.