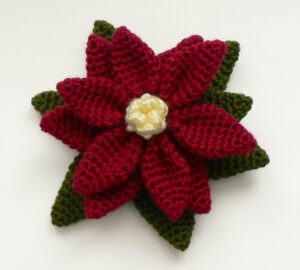
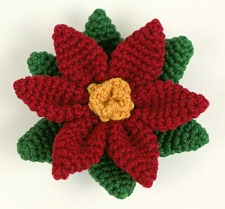
Crochet a large poinsettia flower for Christmas – perfect as a table centrepiece or as a decoration. Or make a smaller one in fine yarn or thread to wear as a pin on your coat, a Christmas tree decoration, or anything else you can think of!
Notes
- Do not join at the end of each round; rounds are worked in continuous spirals.
- Use a stitch marker to mark the beginning of each round. Move the marker up each time you start a new round.
You will need…
- E US/3.5mm crochet hook
- Small amount of worsted weight yarn in red, green and yellow
- Yarn needle to weave in ends
- Stitch marker
I used worsted weight yarn and a size E hook, which produced a large 6.5″ diameter flower (approx 5″ diameter for the small poinsettia). Try using a finer yarn or crochet thread with a correspondingly smaller hook to give a more compact flower.
Ingredients
Large Poinsettia:
- 6 of Style A in red
- 6 of Style B in red or green
- 6 of Style C in green
- 1 centre in yellow
Small Poinsettia:
- 6 of Style A in red
- 6 of Style B in green
- 1 centre in yellow
Crochet Instructions
Style A
Make a magic ring, ch 1.
Rnd 1: 4 sc in magic ring. (4 st)
Rnd 2: (2 sc in next st, sc in next st) twice. (6 st)
Rnd 3: (2 sc in next st, sc in next 2 st) twice. (8 st)
Rnd 4: (2 sc in next st, sc in next 3 st) twice. (10 st)
Rnd 5: (2 sc in next st, sc in next 4 st) twice. (12 st)
Rnd 6: (2 sc in next st, sc in next 5 st) twice. (14 st)
Rnds 7-8: sc in each st around. (14 st)
Rnd 9: (invdec, sc in next 5 st) twice. (12 st)
Rnd 10: (invdec, sc in next 4 st) twice. (10 st)
Rnd 11: (invdec, sc in next 3 st) twice. (8 st)
Join with sl st to next st. Fasten off, leaving long end of yarn.
Style B
Make a magic ring, ch 1.
Rnd 1: 4 sc in magic ring. (4 st)
Rnd 2: (2 sc in next st, sc in next st) twice. (6 st)
Rnd 3: (2 sc in next st, sc in next 2 st) twice. (8 st)
Rnd 4: (2 sc in next st, sc in next 3 st) twice. (10 st)
Rnd 5: (2 sc in next st, sc in next 4 st) twice. (12 st)
Rnd 6: (2 sc in next st, sc in next 5 st) twice. (14 st)
Rnd 7: (2 sc in next st, sc in next 6 st) twice. (16 st)
Rnd 8: sc in each st around. (16 st)
Rnd 9: (invdec, sc in next 6 st) twice. (14 st)
Rnd 10: (invdec, sc in next 5 st) twice. (12 st)
Rnd 11: (invdec, sc in next 4 st) twice. (10 st)
Rnd 12: (invdec, sc in next 3 st) twice. (8 st)
Join with sl st to next st. Fasten off, leaving long end of yarn.
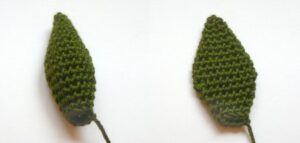
Style C
Make a magic ring, ch 1.
Rnd 1: 4 sc in magic ring. (4 st)
Rnd 2: (2 sc in next st, sc in next st) twice. (6 st)
Rnd 3: (2 sc in next st, sc in next 2 st) twice. (8 st)
Rnd 4: (2 sc in next st, sc in next 3 st) twice. (10 st)
Rnd 5: (2 sc in next st, sc in next 4 st) twice. (12 st)
Rnd 6: (2 sc in next st, sc in next 5 st) twice. (14 st)
Rnd 7: (2 sc in next st, sc in next 6 st) twice. (16 st)
Rnd 8: (2 sc in next st, sc in next 7 st) twice. (18 st)
Rnds 9-10: sc in each st around. (18 st)
Rnd 11: (invdec, sc in next 7 st) twice. (16 st)
Rnd 12: (invdec, sc in next 6 st) twice. (14 st)
Rnd 13: (invdec, sc in next 5 st) twice. (12 st)
Rnd 14: (invdec, sc in next 4 st) twice. (10 st)
Rnd 15: (invdec, sc in next 3 st) twice. (8 st)
Join with sl st to next st. Fasten off, leaving long end of yarn.
Centre
Make a magic ring, ch 1.
Rnd 1: 6 sc in magic ring. (6 st)
Rnd 2: in front loops only, (sc, ch2, sc) in each st around. (6 loops formed)
Rnd 3: in remaining back loops of Rnd 1, 5 sc in each st around. (30 st)
The stitches of Rnd 3 will want to crinkle up into a loopy ruffle – let them do this! You want them to stick up to form the centre flowers of the poinsettia.
Assembly Instructions
Style A
1. Flatten out each petal/leaf.
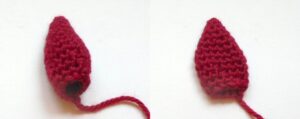
2. Fold the petal up along the centre line, so the two ends of the open edge meet. Using a yarn needle and the long yarn end, make a couple of stitches at the open edge between the two ends, to keep them together.

3. String all 6 petals together by running a length of yarn on a yarn needle (you can use one of the yarn ends or cut a new length) through the folded edge of each petal.
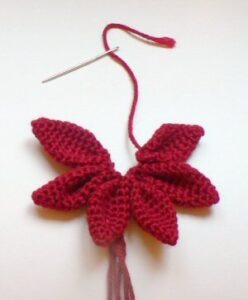
4. Run the yarn through the first petal again to form a circle, pull tight and knot to keep it in position.
Styles B and C
1. Flatten out each petal/leaf.
2. Arrange one leaf over a second, so that one side of the open end of one is over the midpoint of the open end of the next, and they are arranged at approx 60 degrees (think snowflakes or slices of pie to judge the angle – you don’t have to be accurate).
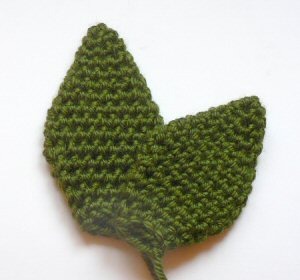
3. Use a yarn needle and the long yarn end from one of the leaves to stitch them together, joining the two leaves with small stitches at the end and about a third of the way up the leaves.
4. Arrange another leaf over the top leaf, in the same position and angle, and stitch in the same way.
5. Continue until all 6 leaves are joined, and each leaf overlaps over one leaf and under another. There should be a small gap in the centre.
6. Pull any loose yarn ends through to the back.
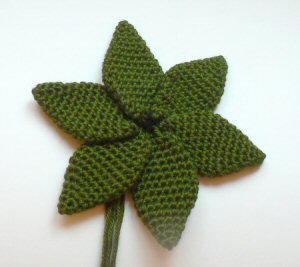
Final Assembly
You should now have two (or three) rings of petals/leaves and one yellow centre. To finish assembling, arrange each layer by pulling the loose yarn ends through the centre hole of the previous layers, so they are all at the back of the flower. The layer order is (bottom to top):
Large poinsettia: C-B-A-centre
Small poinsettia: B-A-centre
Rotate the layers so their angles are offset and all the leaves are visible.
Divide the yarn ends at the back into two groups and tie the two groups in a secure knot. Depending on what you’d like to do with your flower, you can weave in all the yarn ends, leave them long to tie it onto something, or trim them down.